Introduction
This guide is a simple and practical introduction to start working with git from scratch. Here, we will go straight to the point. This step by step guide to a Git workflow aims to help give an introductory overview for managing any project.
Let’s get started on using Git now.
1. Installation
Verify if Git is installed by using the following command in the command prompt:
git --version
2. Create or get a repository
To start working on a Git repository, you have the choice to either create a new one or use an existing one (from GitHub for instance).
Create a new repository
create a new directory, create a directory and perform a
git init
inside to create a new git repository.
Checkout a repository
create a working copy of a local repository by running the command
git clone /path/to/repository
when using a remote server, your command will be
git clone username@host:/path/to/repository
3. Save our changes
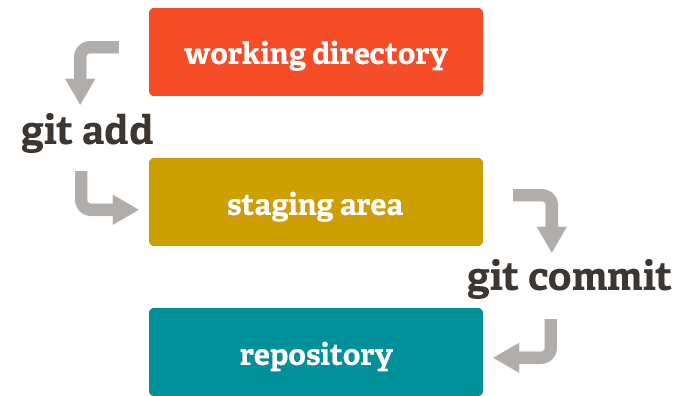
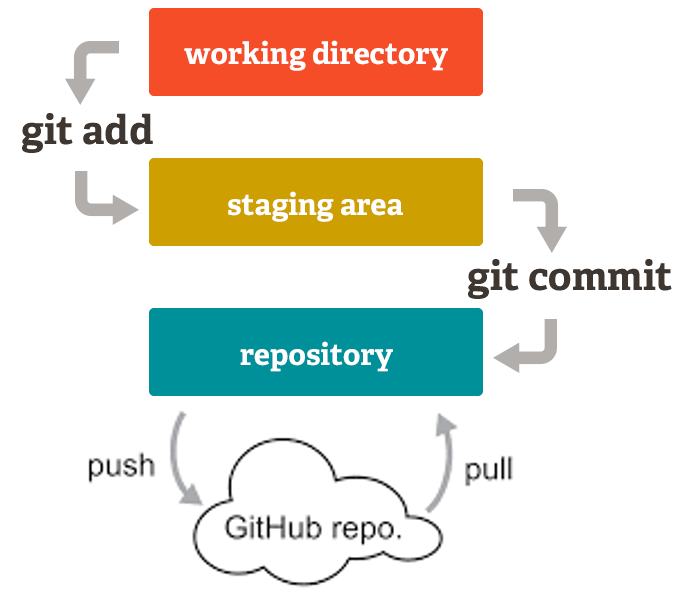
Our local repository consists of three "trees" maintained by git.
The first one is your Working Directory which holds the actual files.
The second one is the Index which acts as a staging area.
And finally, the HEAD which points to the last commit we have made.
A. Commit
Note : Git comes with built-in GUI tools for committing - git-gui.
We recommend you to use it in order to
avoid being struggled with the command line. You just have to launch it within your repository:
git gui
Add & commit
You can propose changes (add it to the Index) using
git add <filename>
git add *
This is the first step in the basic git workflow. To actually commit these changes use
git commit -m "Commit message"
Now the file is committed to the HEAD, but not in your remote repository yet.
B. Push
First thing first, we need a host (such as Github, Gitlab, Bitbucket...) to put it online. If it has not been done yet, just create an account on one of this platform.
Pushing changes
Your changes are now in the HEAD of your local working copy.
To send those changes to your remote repository, execute
git push origin master
Change master to whatever branch you want to push your changes to.
If you have not cloned an existing repository and want to connect
your repository to a remote server, you need to add it with
git remote add origin <server>
Now you are able to push your changes to the selected remote server
The full workflow results as the following:
4. Branching
A. Branches
Branching allows each developer to branch out from the original code base and isolate their work from others. It also helps Git to easily merge versions later on.
Imagine that you are working with your colleagues on the same file. There is a solid chance that someone will, at least partially, overwrite one other’s work. We can avoid that by branching in order to isolates our work from that of other team members.
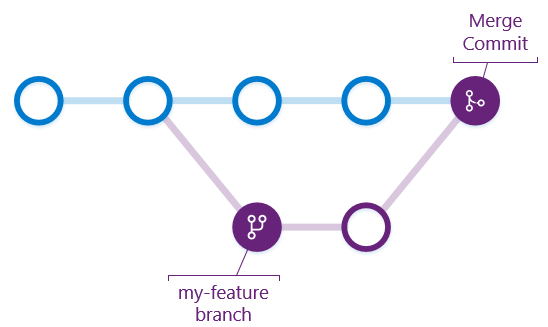
In short, a Git branch is an independent line of development. Note: each node on the image above represents a commit.
Branches
The master branch is the "default" branch when you create a repository. Use other branches for development and merge them back to the master branch upon completion.

create a new branch named "feature_x" and switch to it using
git checkout -b feature_x
switch back to master
git checkout master
and delete the branch again
git branch -d feature_x
a branch is not available to others unless you push
the branch to your remote repository
git push origin <branch>
Note : Git comes with built-in GUI tools for browsing - gitk.
We recommend you to use it in order to get a good overview of your branches.
You just have to launch it within your repository:
gitk
B. Update & Merge
update & merge
To update your local repository to the newest commit, execute
git pull
in your working directory to fetch and merge remote changes.
to merge another branch into your active branch (e.g. master), use
git merge <branch>
in both cases git tries to auto-merge changes. Unfortunately,
this is not always possible and results in conflicts.
You are responsible to merge those conflicts
manually by editing the files shown by git. After changing,
you need to mark them as merged with
git add <filename>
before merging changes, you can also preview them by using
git diff <source_branch> <target_branch>
Reverting changes
If you instead want to drop all your local changes and commits, fetch the latest history from the server and point your local master branch at it like this:
Replace local changes
git fetch origin
git reset --hard origin/master
5. Extras
Tag & Version
It is recommended to create tags for software releases.
You can create a new tag named Hurna v1.3.0 by executing
git tag -a v1.3.0 -m "Hurna v1.3.0"
Log
in its simplest form, you can study repository history using
git log
You can add a lot of parameters to make the log look like what you want.
To see only the commits of a certain author:
git log --author=michael-jeulinl
To see a very compressed log where each commit is one line:
git log --pretty=oneline
Or maybe you want to see an ASCII art tree of all the branches,
decorated with the names of tags and branches:
git log --graph --oneline --decorate --all
See only which files have changed:
git log --name-status
These are just a few of the possible parameters you can use. For more, see
git log --help
Wonderful! If you get this far, you master everything you need to manage a project and its versions. The next courses are about putting everything into advanced practices.